Tip Talk - Altered Clip Boards

During a recent 24/7 MOMS LIve web cast we shared the How to create an Altered Clipboard to use in keeping your mom world organized.
A lot of people are complaining lately about "holiday creep" - the fact that retailers keep putting up their Christmas displays earlier and earlier every year. And I admit, I was a bit thrown the other day when the toy store I was shopping at had Christmas music playing. Even my seven-year-old commented on it along the lines of "what's up with that?". But in reality for those of us who are crafters, thoughts of the holidays start long before October 31st. We have to in order to get all the handmade gifts done in time.
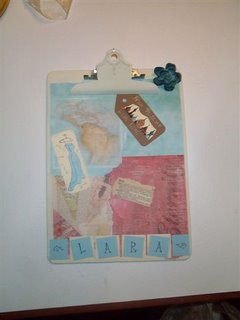
I hit upon an idea back in August when I found a boxful of masonite clipboards for cheap at a garage sale. Altered clipboards for everyone! These photos show two clipboards I've already made. Wanna know how it's done? See the instructions at the end of this post.
My question for you today is: "what are you giving to the special service provider-type people in your children's lives this year?". I'm talking teachers (school, church, piano, etc.), babysitters and other special folks who
 deserve a gift of appreciation. Share your ideas (and in the weeks to come I'll try to share more of mine).
Altered Clipboard Instructions:
Supplies - wood clipboard
patterned paper
stamps, stickers or other embellishments
scrapbooking/paper crafting adhesive
small clamp
acrylic craft paints
Mod Podge
clear acrylic spray (optional)
Begin by selecting your paper and color scheme. You can paint the back and outer edges to complement your scheme. I usually paint the clip also after the rest is done (the clip should be clamped open when painting the wood surface and gluing on your papers). Next decide how your going to arrange the paper and any other elements (such as tags or words, etc). Stamp (and color, if necessary) any images or words you will be using. Then begin gluing the pieces onto the clipboard (be sure if any elements are overlapping that you glue them in the correct order). I usually run the base layer through my Xyron machine as I find that adhesive to be the strongest. Once you are done painting and gluing you'll want to seal all the pieces by coating them with Mod Podge. I usually use a satin finish rather than glossy. It is recommended that you wet sand between coats, but I find that this sometimes mars the images and the paper. 2-3 coats of Mod Podge should be sufficient. Once you've completed the clipboard you can give a final coat of protection (a necessary step if you expect the recipient to be using the clipboard) by spraying it with a clear acrylic. For the women on my gift list I like to add an organza ribbon to the clip for an added touch.
There you go! Have fun altering a clipboard. If you make one, tell me about it.
For more ideas like this and other information on creating inexpensive gifts and decorations, check out the new book, Pampering Gifts: Crafting a Ministry of Treating People Well For Less.
Labels: DIY Moms
posted by 24/7 MOMS @ 6:32 AM
![]()
![]()

3 Comments:
for christmas, i start shopping the sales early! last year, i got the daycare teachers all vera bradley belts for just $5 online! they have a great clearance section.
great inexpensive and personal idea...have a while before Christmas, but in my experience as a teacher, a Thanksgiving gift is even more cherished. Neat end of summer project with kids too.
Awesome idea...I love these!
Post a Comment
Subscribe to Post Comments [Atom]
<< Home